环境准备
UV安装
mac环境安装命令:
1
| curl -LsSf https://astral.sh/uv/install.sh | sh
|
安装python 3.13
1
2
3
4
5
| # 查看已安装的python版本
uv python list
# 安装python版本3.13
uv python install 3.13
|
创建工作目录:langchain-python
1
2
3
4
5
| # 使用指定python版本初始化工作目录
uv init langchain-python -p 3.13
# 进入工作目录
cd langchain-python
|
安装依赖
1
2
3
4
5
6
7
8
9
10
11
12
13
14
| # 添加依赖
uv add langchain langgraph
uv add langchain-mcp-adapters
uv add -U langchain-deepseek
# 一些其他依赖
uv add grpcio grpcio-tools
# 对于使用pip作为依赖关系的项目
pip install -U langchain langgraph
pip install -U langchain-mcp-adapters
pip install -U langchain-deepseek
|
MCP开发
开发计算器MCP Server
通过Python开发工具,创建一个python文件,命名为math_server.py,通过stdio传输协议发布。源代码如下:
1
2
3
4
5
6
7
8
9
10
11
12
13
14
15
16
17
18
19
20
21
22
23
24
25
26
27
28
| from mcp.server.fastmcp import FastMCP
import logging
# 配置日志记录器
logging.basicConfig(
level=logging.INFO, # 设置日志级别为 INFO
format="%(asctime)s - %(levelname)s - %(message)s" # 日志格式
)
logger = logging.getLogger(__name__)
# 创建 FastMCP 实例
mcp = FastMCP("Math")
@mcp.tool()
def add(a: int, b: int) -> int:
"""Add two numbers"""
logger.info("The add method is called: a=%d, b=%d", a, b) # 记录加法调用日志
return a + b
@mcp.tool()
def multiply(a: int, b: int) -> int:
"""Multiply two numbers"""
logger.info("The multiply method is called: a=%d, b=%d", a, b) # 记录乘法调用日志
return a * b
if __name__ == "__main__":
logger.info("Start math server through MCP") # 记录服务启动日志
mcp.run(transport="stdio") # 启动服务并使用标准输入输出通信
|
开发天气预报MCP Server
通过Python开发工具,创建一个python文件,命名为weather_server.py,通过sse传输协议发布。源代码如下:
1
2
3
4
5
6
7
8
9
10
11
12
13
14
15
16
17
18
19
20
21
| from mcp.server.fastmcp import FastMCP
import logging
# 配置日志记录器
logging.basicConfig(
level=logging.INFO, # 设置日志级别为 INFO
format="%(asctime)s - %(levelname)s - %(message)s" # 日志格式
)
logger = logging.getLogger(__name__)
mcp = FastMCP("Weather")
@mcp.tool()
async def get_weather(location: str) -> str:
"""Get weather for location."""
logger.info("The get_weather method is called: location=%s", location)
return "天气阳光明媚,晴空万里。"
if __name__ == "__main__":
logger.info("Start weather server through MCP") # 记录服务启动日志
mcp.run(transport="sse")
|
开发MCP Client
通过Python开发工具,创建一个python文件,命名为client.py。源代码如下:
1
2
3
4
5
6
7
8
9
10
11
12
13
14
15
16
17
18
19
20
21
22
23
24
25
26
27
28
29
30
31
32
33
34
35
36
37
38
39
40
41
42
43
44
45
46
47
48
49
50
51
52
53
54
55
56
57
58
59
60
61
62
63
64
65
66
67
68
69
70
71
72
73
74
75
76
77
78
79
80
81
82
83
84
85
86
87
88
89
90
91
92
93
94
95
96
| import asyncio
from langchain_mcp_adapters.client import MultiServerMCPClient
from langgraph.prebuilt import create_react_agent
from langchain_openai import ChatOpenAI # 使用兼容OpenAI的接口
import os
# 初始化 DeepSeek 大模型客户端
DEEPSEEK_API_KEY = os.getenv("DEEPSEEK_API_KEY", "xxx")
llm = ChatOpenAI(
model="deepseek-r1", # 指定 DeepSeek 的模型名称
api_key=DEEPSEEK_API_KEY, # 阿里云 API Key
base_url="https://dashscope.aliyuncs.com/compatible-mode/v1", # 阿里云兼容端点
temperature=0.7,
max_tokens=1024
)
# 解析并输出结果
def print_optimized_result(agent_response):
"""
解析代理响应并输出优化后的结果。
:param agent_response: 代理返回的完整响应
"""
messages = agent_response.get("messages", [])
steps = [] # 用于记录计算步骤
final_answer = None # 最终答案
for message in messages:
if hasattr(message, "additional_kwargs") and "tool_calls" in message.additional_kwargs:
# 提取工具调用信息
tool_calls = message.additional_kwargs["tool_calls"]
for tool_call in tool_calls:
tool_name = tool_call["function"]["name"]
tool_args = tool_call["function"]["arguments"]
steps.append(f"调用工具: {tool_name}({tool_args})")
elif message.type == "tool":
# 提取工具执行结果
tool_name = message.name
tool_result = message.content
steps.append(f"{tool_name} 的结果是: {tool_result}")
elif message.type == "ai":
# 提取最终答案
final_answer = message.content
# 打印优化后的结果
print("\n计算过程:")
for step in steps:
print(f"- {step}")
if final_answer:
print(f"\n最终答案: {final_answer}")
# 定义异步主函数
async def main():
# 创建客户端实例
client = MultiServerMCPClient(
{
"math": {
"command": "python",
"args": ["./math_server.py"],
"transport": "stdio",
},
"weather": {
"url": "http://localhost:8000/sse",
"transport": "sse",
}
}
)
# 获取工具
tools = await client.get_tools()
# 创建代理
agent = create_react_agent(llm, tools)
# 循环接收用户输入
while True:
try:
# 提示用户输入问题
user_input = input("\n请输入您的问题(或输入 'exit' 退出):")
if user_input.lower() == "exit":
print("感谢使用!再见!")
break
# 调用代理处理问题
agent_response = await agent.ainvoke({"messages": user_input})
# 调用抽取的方法处理输出结果
print_optimized_result(agent_response)
except Exception as e:
print(f"发生错误:{e}")
continue
# 使用 asyncio 运行异步主函数
if __name__ == "__main__":
asyncio.run(main())
|
关键代码解释说明:
langgraph.prebuilt 是 LangGraph 框架中的一个模块,主要用于提供预构建的工具和功能,以简化复杂任务的实现。LangGraph 是一个基于 LangChain 的扩展框架,专注于构建多智能体(multi-agent)系统、工作流管理和任务编排。langgraph.prebuilt 提供了一些现成的组件和工具,帮助开发者快速搭建特定的工作流或任务逻辑,而无需从零开始编写代码。
(1)from langgraph.prebuilt import create_react_agent提供了预定义的代理(Agent)模板。langgraph.prebuilt 提供了一些预定义的代理(Agent)模板,例如基于反应式(reactive)逻辑的代理。 这些模板可以快速生成能够处理特定任务的代理,比如问答、任务分解、工具调用等。
(2)agent = create_react_agent(llm, client.get_tools())实现了工具集成与任务编排。支持将多个工具(tools)集成到工作流中,并通过预定义的逻辑进行任务编排。例如,您可以轻松地将算术计算工具、搜索引擎工具或其他自定义工具集成到代理的工作流中。
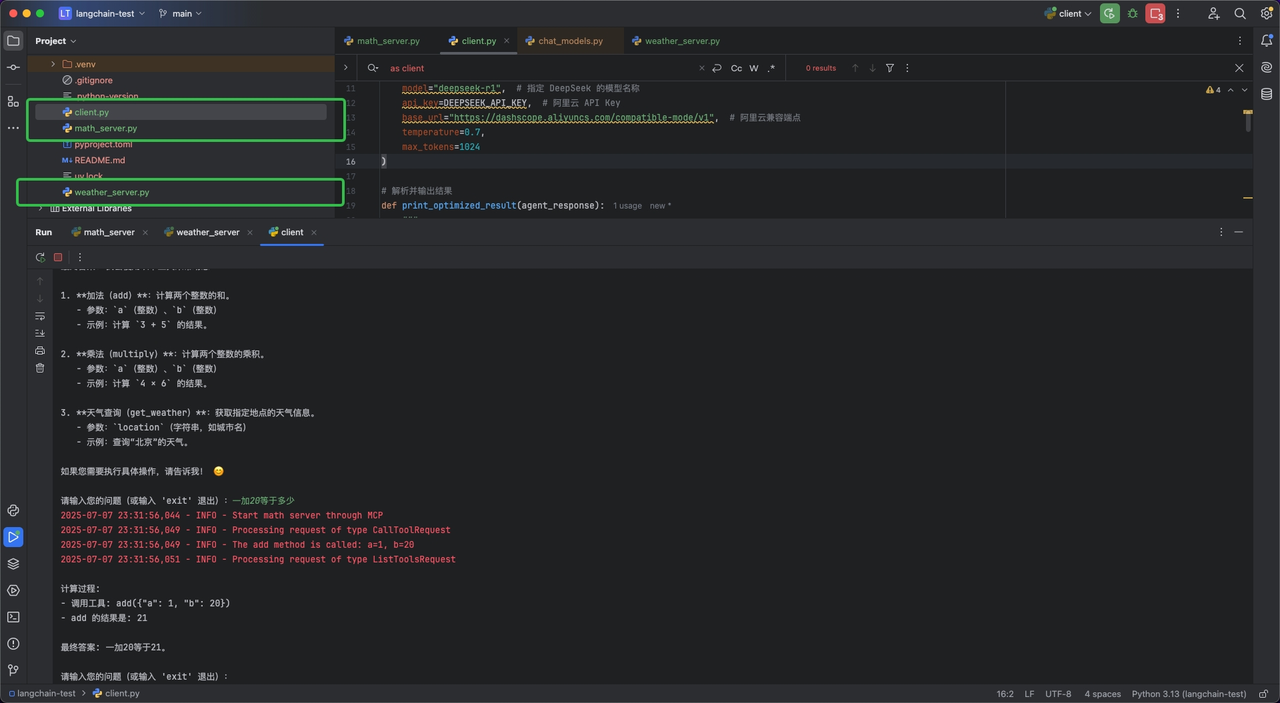
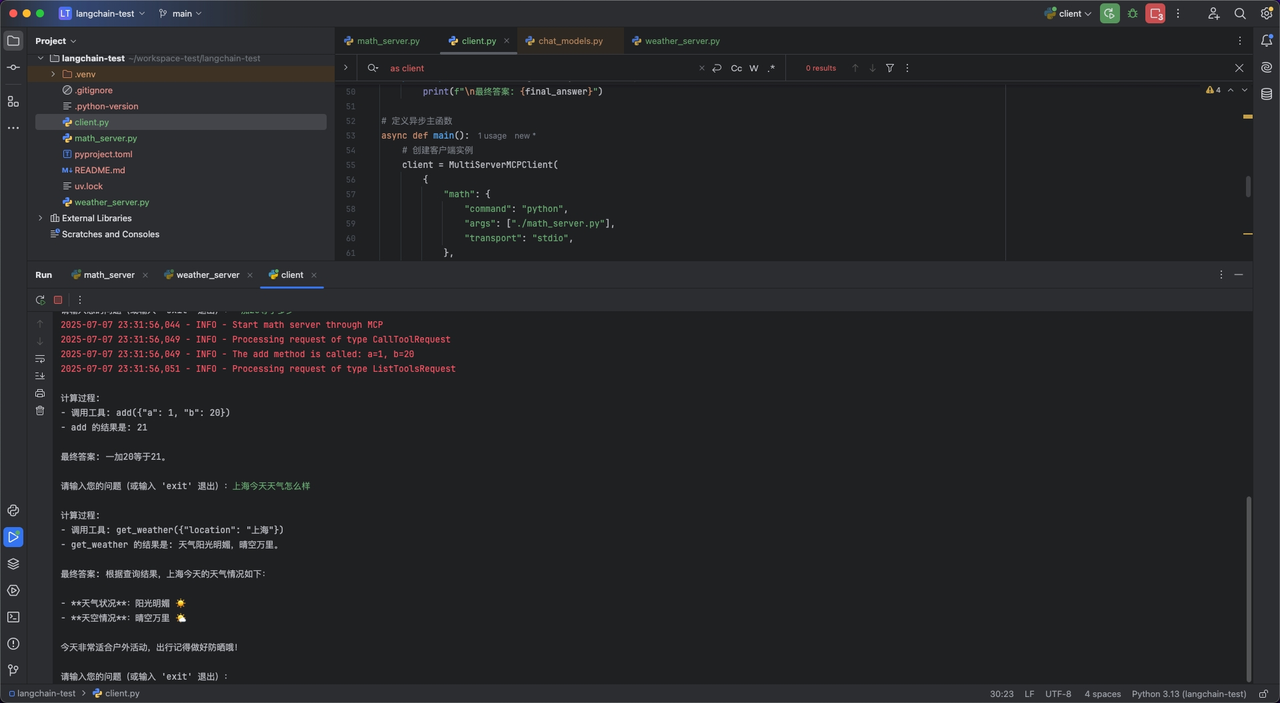
运行测试
先运行MCP Server,即分别运行math_server.py和weather_server.py,再运行math_client.py,进行AI对话,观察日志输出结果,确定是否理解了用户的输入信息,并分别调用了对应的MCP Server服务。