1、部署命令 这个是很多博客教程都在使用的部署命令:
1
2
3
4
make manifests make install export ENABLE_WEBHOOKS=false make run
我们使用之前的demo来进行部署验证:Kubernetes-Operator篇-02-脚手架熟悉
这里面涉及到的makefile的配置可以参考:Kubernetes-Operator篇-03-kubebuilder的Makefile文件熟悉
下面让我来看看这些命令的含义,并且都是在干什么
1.1 make manifests make manifests:
1
2
3
.PHONY: manifests manifests: controller-gen ## Generate WebhookConfiguration, ClusterRole and CustomResourceDefinition objects. $(CONTROLLER_GEN) rbac:roleName=manager-role crd webhook paths="./..." output:crd:artifacts:config=config/crd/bases
这里主要是为了生成WebhookConfiguration、ClusterRole和CustomResourceDefinition 对象。
在生成了WebhookConfiguration、ClusterRole和CustomResourceDefinition 对象后,我们可以进行查看,但是不要手动去修改,因为后面的make install和make run等命令,都依赖该目标,并且因为都是使用的.PHONY关键字来申明的伪目标,所以每次执行make install和make run都会执行manifests依赖。
所以单独执行make manifests的意义是什么呢,个人观点,在一个完整部署动作中,完成了代码变更后,是需要通过make manifests来进行配置的生成查看的。但是如果在本部署动作中,不关心生成配置的具体情况,只想走一遍流程,或者直接测试,那其实忽略不执行也ok,毕竟后面每一步都会重新生成且覆盖。
1.2 make install make install:
1
2
3
.PHONY: install install: manifests kustomize ## Install CRDs into the K8s cluster specified in ~/.kube/config. $(KUSTOMIZE) build config/crd | $(KUBECTL) apply -f -
先运行manifests和kustomize目标,然后使用kustomize 构建config/crd目录中的资源,并使用kubectl将其应用到集群。
这里manifests目标会生成WebhookConfiguration、ClusterRole和CustomResourceDefinition 对象,并保存在config/crd/bases目录下。
而kustomize目标是进行kustomize工具的下载,如果二进制文件不存在则下载,然后生成二进制文件的软链,二进制文件只在首次下载,后续都是仅更新软链。
下面的命令是install实际执行的动作:
1 $ (KUSTOMIZE) build config/crd | $(KUBECTL) apply -f -
1.3 make run make run:
1
2
3
.PHONY: run run: manifests generate fmt vet ## Run a controller from your host. go run ./cmd/main.go
先运行manifests、generate、fmt和vet目标,然后使用go run命令运行cmd/main.go文件
这里manifests目标会生成WebhookConfiguration、ClusterRole和CustomResourceDefinition 对象,并保存在config/crd/bases目录下。
而generate 目标是使用controller-gen工具生成包含DeepCopy、DeepCopyInto, 和DeepCopyObject方法实现的代码。
至于fmt和vet目标就是执行go的命令:fmt ./...和go vet ./...
下面的命令是install实际执行的动作:
1.4 环境变量ENABLE_WEBHOOKS 环境变量ENABLE_WEBHOOKS控制着webhook的启用与否。
这段代码是kubectl生成的operator项目的main函数中启用webhook逻辑的部分:
1
2
3
4
5
6
if os.Getenv("ENABLE_WEBHOOKS") != "false" { if err = (&appsv1.Myapp{}).SetupWebhookWithManager(mgr); err != nil { setupLog.Error(err, "unable to create webhook", "webhook", "Myapp") os.Exit(1) } }
这里很简单粗暴的根据环境变量ENABLE_WEBHOOKS来决定是否启用webhook,os.Getenv的定义:
1
2
3
4
5
6
7
8
9
10
11
12
13
14
15
16
17
18
19
20
21
22
23
24
25
26
27
func Getenv(key string) string { testlog.Getenv(key) v, _ := syscall.Getenv(key) return v } func Getenv(key string) (value string, found bool) { envOnce.Do(copyenv) if len(key) == 0 { return "", false } envLock.RLock() defer envLock.RUnlock() i, ok := env[key] if !ok { return "", false } s := envs[i] for i := 0; i < len(s); i++ { if s[i] == '=' { return s[i+1:], true } } return "", false }
这里返回的值,可能是空字符串,也可能是bool类型值的字符串,但是只要值不是false,就会开启webhook。
至于这里为什么要临时关闭webhook,因为启用webhook是需要证书的,也就是我们需要在本地安装cert-manager,并且还需要配置,在本实验项目就不搞太复杂了。
2、CRD 调试 2.1 make manifests 1 2 3 4 5 6 make manifests /home/king/workspace/king-devops/operator/myapp-operator/bin/controller-gen rbac:roleName=manager-role crd webhook paths="./..." output:crd:artifacts:config=config/crd/bases ls -lh config/crd/bases/ 总计 1.1M -rw-rw-r-- 1 king king 1.1M 10月 5 16:17 apps.kubenode.kingtest.com_myapps.yaml
2.2 make install 命令:
2.2.1 make install错误:dial tcp 127.0.0.1:8080: connect: connection refused 1 2 3 4 5 make install /home/king/workspace/king-devops/operator/myapp-operator/bin/controller-gen rbac:roleName=manager-role crd webhook paths="./..." output:crd:artifacts:config=config/crd/bases /home/king/workspace/king-devops/operator/myapp-operator/bin/kustomize build config/crd | kubectl apply -f - error: error validating "STDIN": error validating data: failed to download openapi: Get "http://localhost:8080/openapi/v2?timeout=32s": dial tcp 127.0.0.1:8080: connect: connection refused; if you choose to ignore these errors, turn validation off with --validate=false make: *** [Makefile:131:install] 错误 1
这个错误很诡异: dial tcp 127.0.0.1:8080: connect: connection refused
首先集群是存在的:
1 2 sudo kind get clusters myk8s-test
其次已经使用下面的命令将集群信息,设置进去kubectl的上下文里:
1 sudo kubectl cluster-info --context kind-myk8s-test
sudo kubectl cluster-info –context kind-myk8s-test
1 2 3 4 5 sudo kubectl get nodes NAME STATUS ROLES AGE VERSION myk8s-test-control-plane Ready control-plane 43h v1.31.0 myk8s-test-worker Ready <none> 43h v1.31.0 myk8s-test-worker2 Ready <none> 43h v1.31.0
进一步测试,分别执行kubectl version和kubectl cluster-info dump都遇见了类似的错误:
kubectl version:
1 2 3 4 kubectl version Client Version: v1.31.1 Kustomize Version: v5.4.2 The connection to the server localhost:8080 was refused - did you specify the right host or port?
kubectl cluster-info dump:
1 2 kubectl cluster-info dump The connection to the server localhost:8080 was refused - did you specify the right host or port?
但是很悲催的是,忘记将kind集群的kubeconfig导出到本地,我的理解是,虽然kubectl上下文是有集群kubeconfig的,但是本地并没有,简单来说,就是这个信息是kubectl自身保存的,不是直接使用的系统上存储的kubeconfig
使用下面的命令,将kubeconfig信息保存在$HOME/.kube/config内:
1 sudo kind export kubeconfig --name=myk8s-test --kubeconfig=$HOME/.kube/config
再执行make install命令,本问题已经解决,但是新的问题出现了:
1 2 3 4 5 make install /home/king/workspace/king-devops/operator/myapp-operator/bin/controller-gen rbac:roleName=manager-role crd webhook paths="./..." output:crd:artifacts:config=config/crd/bases /home/king/workspace/king-devops/operator/myapp-operator/bin/kustomize build config/crd | kubectl apply -f - The CustomResourceDefinition "myapps.apps.kubenode.kingtest.com" is invalid: metadata.annotations: Too long: must have at most 262144 bytes make: *** [Makefile:131:install] 错误 1
kubebuilder的github issues中,修复过这个问题: https://github.com/kubernetes-sigs/kubebuilder/pull/2862/commits/2c5b9edf614444acd43ae5f65af1702a5ed63ed6
修复方法:打开Makefile,在 manifests 命令处,修改 crd 为 crd:maxDescLen=0
原始的:
1 2 3 .PHONY: manifests manifests: controller-gen ## Generate WebhookConfiguration, ClusterRole and CustomResourceDefinition objects. $(CONTROLLER_GEN) rbac:roleName=manager-role crd webhook paths="./..." output:crd:artifacts:config=config/crd/bases
修复后的:
1 2 3 .PHONY: manifests manifests: controller-gen ## Generate WebhookConfiguration, ClusterRole and CustomResourceDefinition objects. $(CONTROLLER_GEN) rbac:roleName=manager-role crd:maxDescLen=0 webhook paths="./..." output:crd:artifacts:config=config/crd/bases
问题解决:
1 2 3 4 make install /home/king/workspace/king-devops/operator/myapp-operator/bin/controller-gen rbac:roleName=manager-role crd:maxDescLen=0 webhook paths="./..." output:crd:artifacts:config=config/crd/bases /home/king/workspace/king-devops/operator/myapp-operator/bin/kustomize build config/crd | kubectl apply -f - customresourcedefinition.apiextensions.k8s.io/my
2.2.3 make install验证 查看安装结果:
1 2 3 kubectl get crd NAME CREATED AT myapps.apps.kubenode.kingtest.com 2024-10-05T11:56:22Z
已经可以看到我们定义的crd了。
2.3 make run 命令:
1 2 export ENABLE_WEBHOOKS=false make run
执行结果:
1 2 3 4 5 6 7 8 9 10 11 make run /home/king/workspace/king-devops/operator/myapp-operator/bin/controller-gen rbac:roleName=manager-role crd:maxDescLen=0 webhook paths="./..." output:crd:artifacts:config=config/crd/bases /home/king/workspace/king-devops/operator/myapp-operator/bin/controller-gen object:headerFile="hack/boilerplate.go.txt" paths="./..." go fmt ./... go vet ./... go run ./cmd/main.go 2024-10-05T20:29:02+08:00 INFO setup starting manager 2024-10-05T20:29:02+08:00 INFO starting server {"name": "health probe", "addr": "[::]:8081"} 2024-10-05T20:29:02+08:00 INFO Starting EventSource {"controller": "myapp", "controllerGroup": "apps.kubenode.kingtest.com", "controllerKind": "Myapp", "source": "kind source: *v1.Myapp"} 2024-10-05T20:29:02+08:00 INFO Starting Controller {"controller": "myapp", "controllerGroup": "apps.kubenode.kingtest.com", "controllerKind": "Myapp"} 2024-10-05T20:29:02+08:00 INFO Starting workers {"controller": "myapp", "controllerGroup": "apps.kubenode.kingtest.com", "controllerKind": "Myapp", "worker count": 1}
已经成功启动!!!
2.4 执行debug 2.4.1 启动debug 在上面执行了以下步骤:
1 2 3 4 make manifests make install export ENABLE_WEBHOOKS=false make run
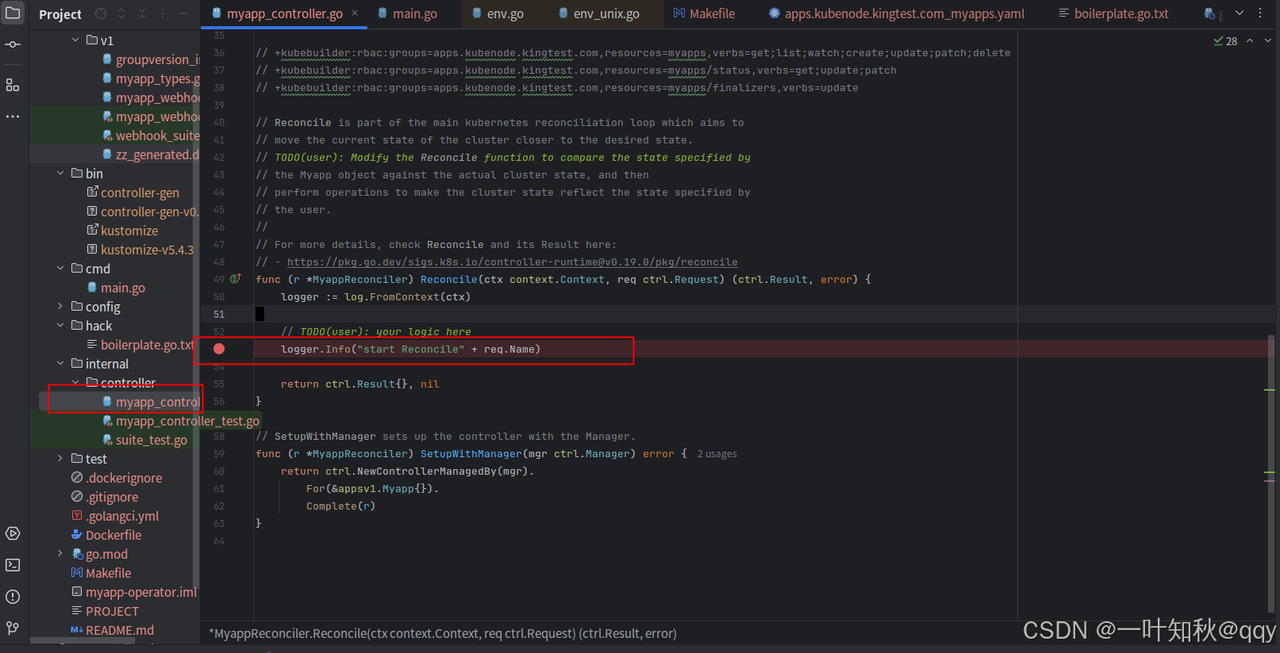
我们先将make run运行的controller停止,然后打开operator项目,在项目的调谐函数内打上断点,然后直接以debug模式启动。
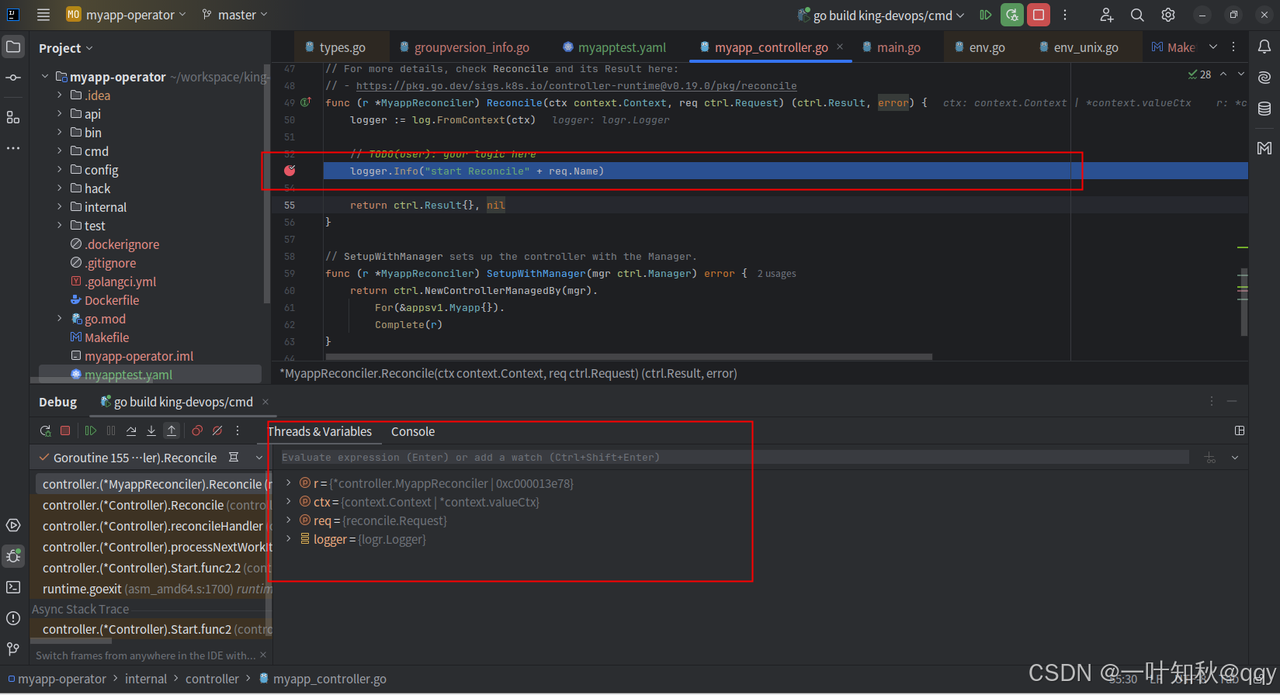
打断点
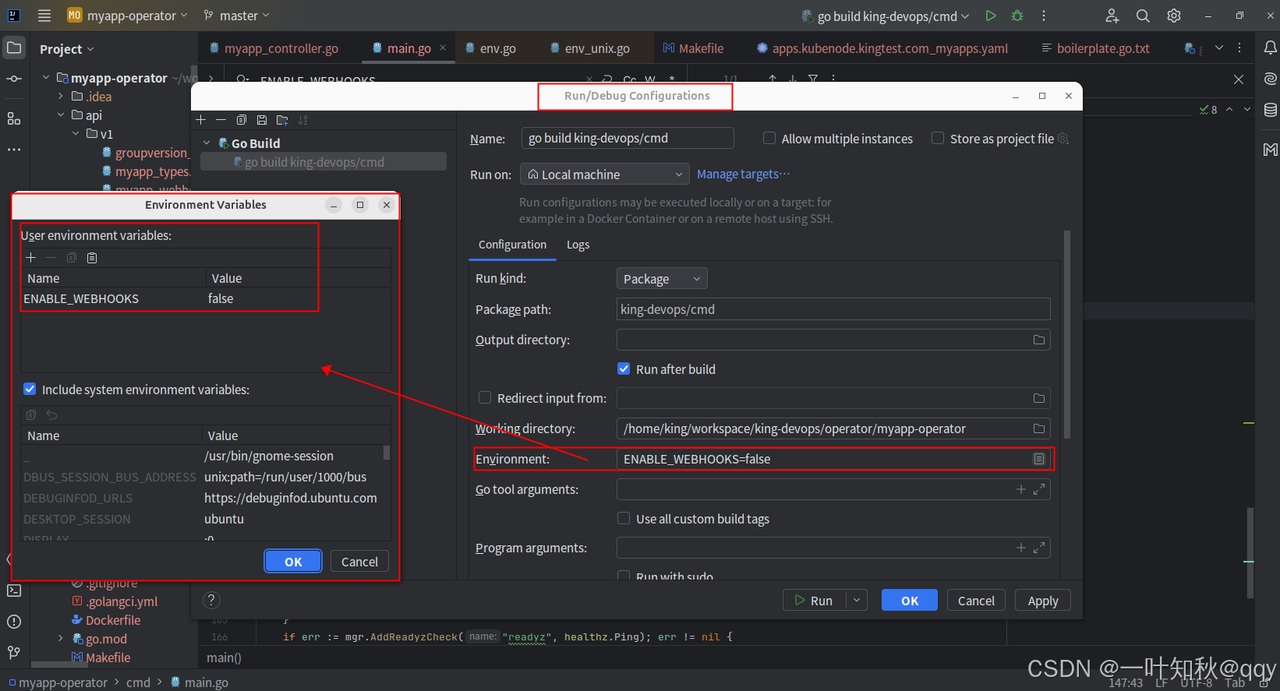
别忘了设置环境变量,关闭webhook
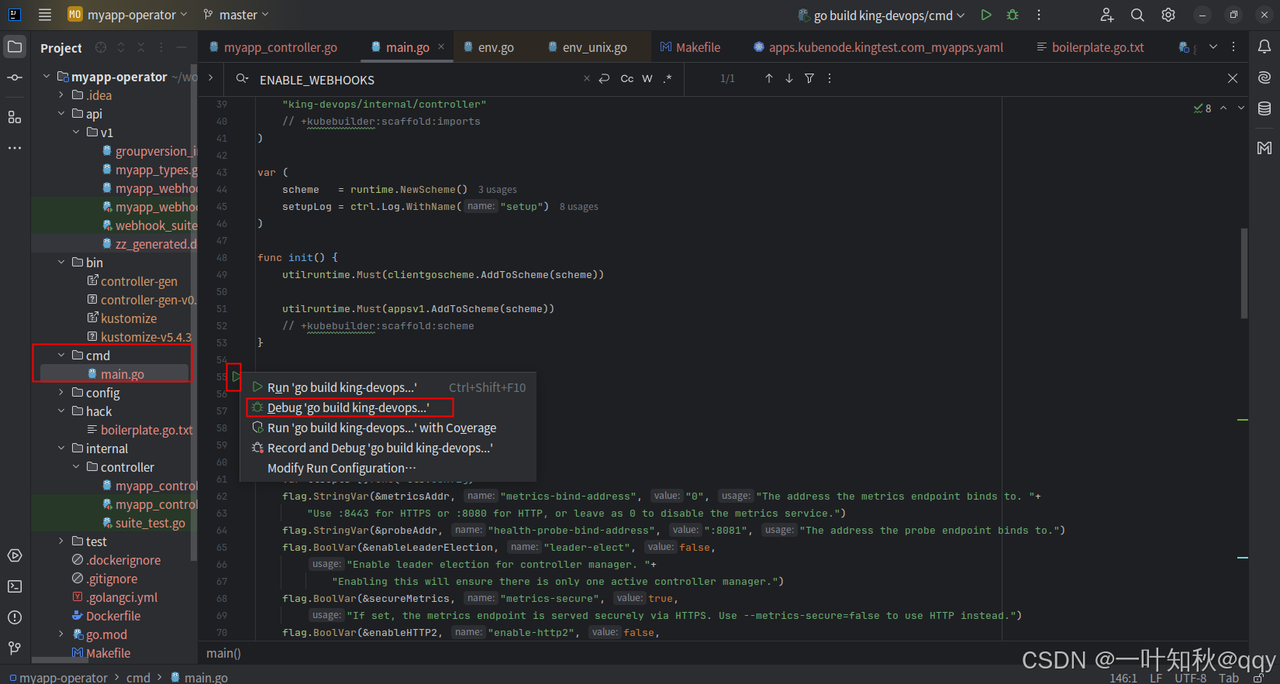
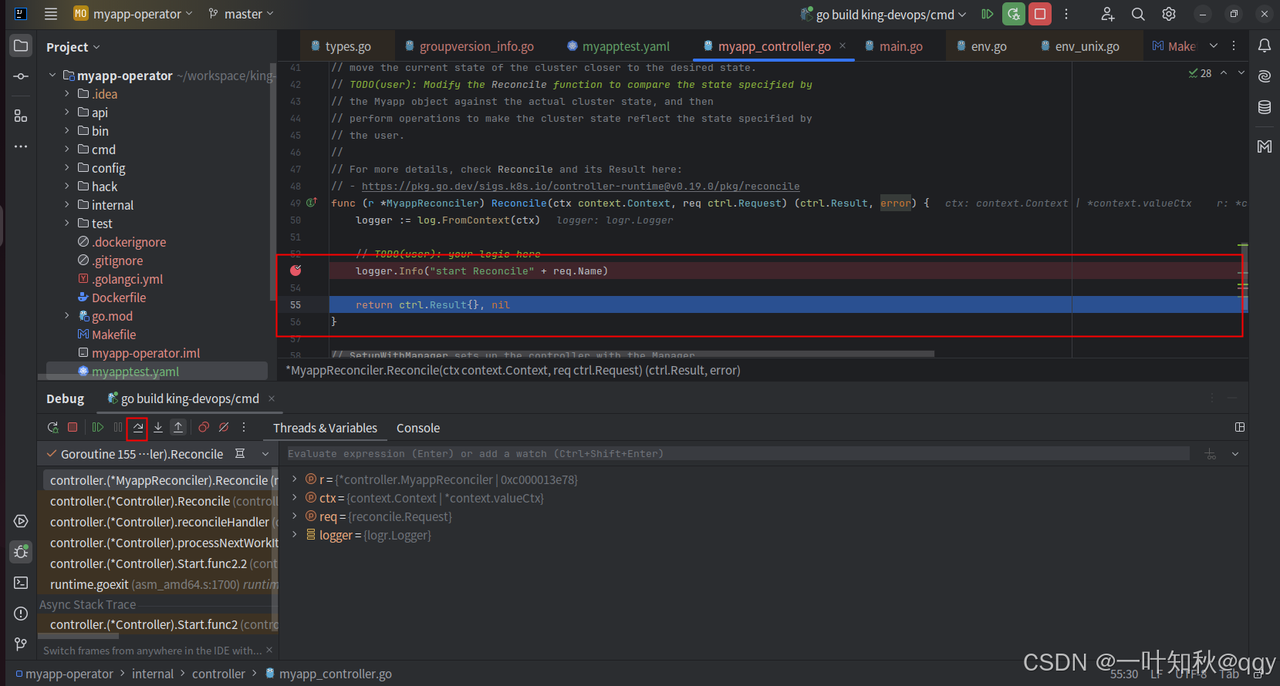
以debug方式启动:
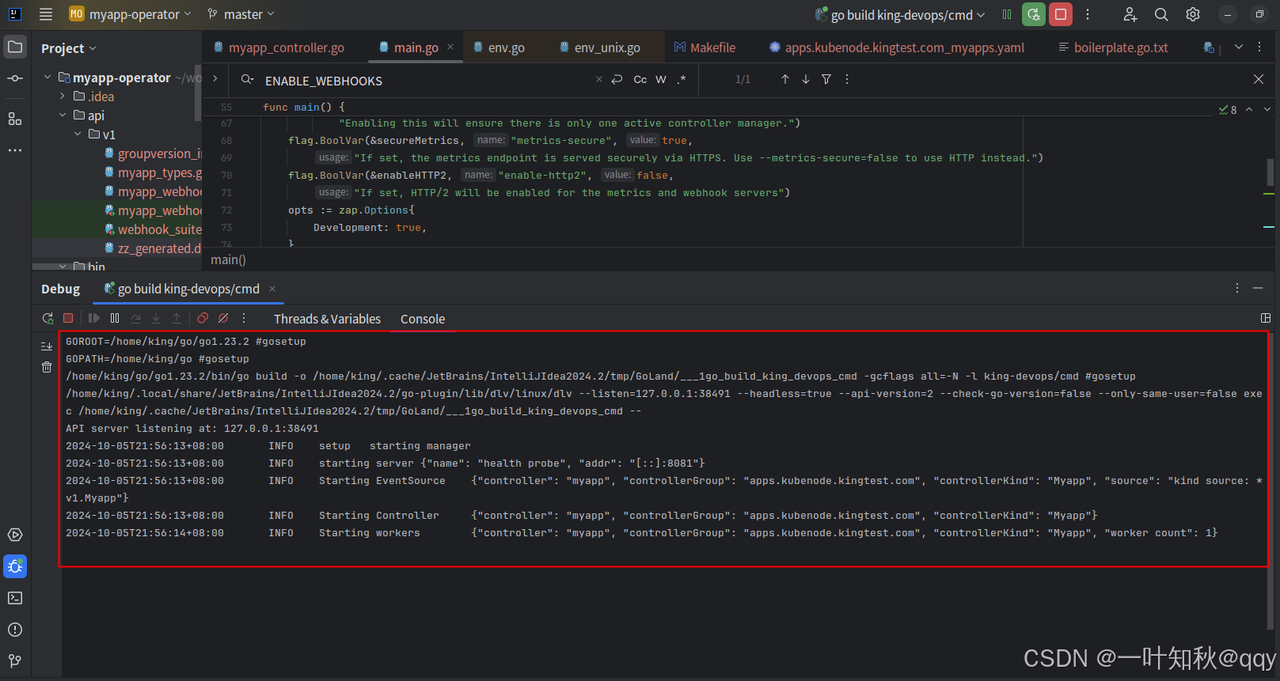
执行结果
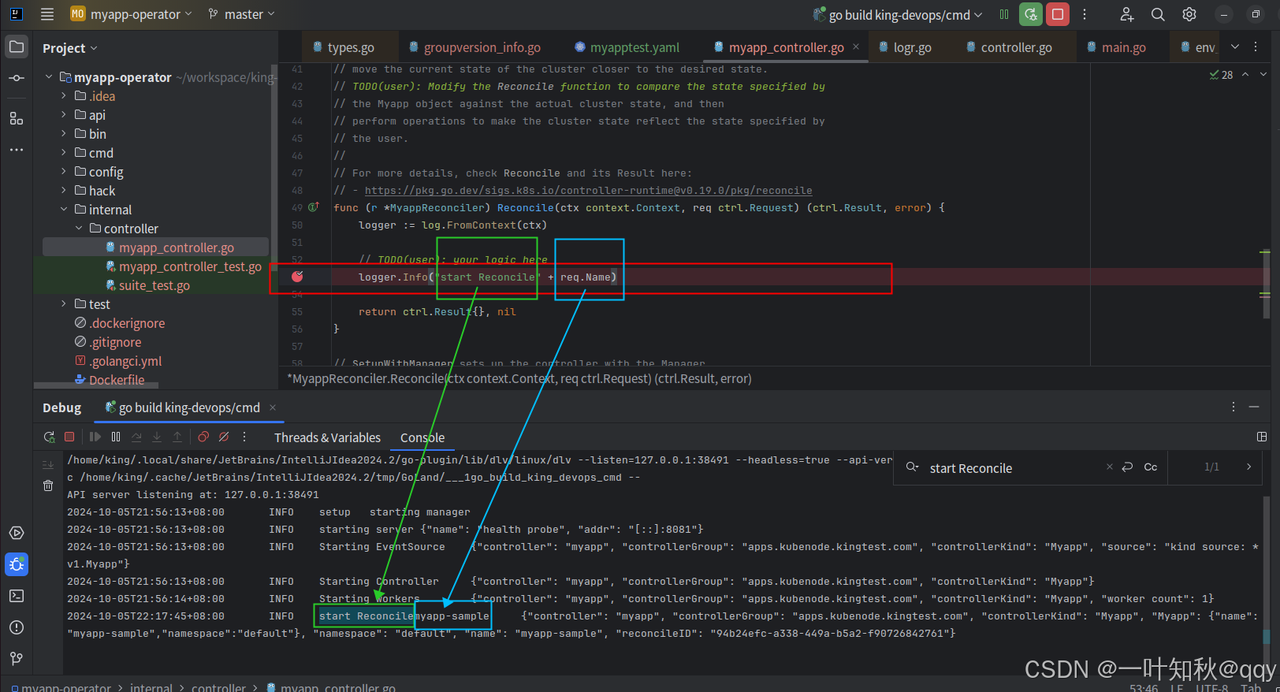
接下来,我们来apply一个资源,测试一下。
2.4.2 crd测试 编写一个测试的yaml:
1 2 3 4 5 6 7 8 9 10 11 12 13 14 15 16 17 18 19 20 apiVersion: apps.kubenode.kingtest.com/v1 kind: Myapp metadata: name: myapp-sample spec: foo: "test value" replicas: 3 selector: matchLabels: app: myapp template: metadata: labels: app: myapp spec: containers: - name: myapp-container image: nginx:latest ports: - containerPort: 80
将测试yaml通过kubectl apply进去集群:
1
2
sudo kubectl apply -f myapptest.yaml myapp.apps.kubenode.kingtest.com/myapp-sample created
然后controller的调谐函数成功断住
再向下执行一步
在终端里已经成功打印出来代码里的日志:
通过kubectl查看crd状态:
1 2 3 sudo kubectl get Myapp -A -owide NAMESPACE NAME AGE default myapp-sample 14m
到此都是符合预期的。
4 构建CRD镜像并部署进k8s 上面我们是在本地运行的controller,那么在实际中该怎么办呢。
答案是将controller打包成docker镜像,然后部署进集群。
构建镜像并推送至你的镜像仓库
1 make docker-build docker-push IMG=<some-registry>/<project-name>:tag
看下makefile的定义:
1 2 3 4 5 6 7 .PHONY: docker-build docker-build: ## Build docker image with the manager. $(CONTAINER_TOOL) build -t ${IMG} . .PHONY: docker-push docker-push: ## Push docker image with the manager. $(CONTAINER_TOOL) push ${IMG}
这里就是使用CONTAINER_TOOL(默认为docker)构建并推送docker镜像,并使用IMG变量指定镜像名称和标签
1 make deploy IMG=<some-registry>/<project-name>:tag
查看makefile定义:
1 2 3 4 .PHONY: deploy deploy: manifests kustomize ## Deploy controller to the K8s cluster specified in ~/.kube/config. cd config/manager && $(KUSTOMIZE) edit set image controller=${IMG} $(KUSTOMIZE) build config/default | $(KUBECTL) apply -f -
先运行manifests和kustomize目标
使用kustomize设置controller镜像为IMG
使用kustomize构建config/default目录中的资源,并使用kubectl将其应用到集群
5 删除controller部署和卸载CRD 删除controller部署:
查看makefile定义:
1 2 3 .PHONY: undeploy undeploy: kustomize ## Undeploy controller from the K8s cluster specified in ~/.kube/config. Call with ignore-not-found=true to ignore resource not found errors during deletion. $(KUSTOMIZE) build config/default | $(KUBECTL) delete --ignore-not-found=$(ignore-not-found) -f -
使用kustomize 构建config/default目录中的资源,并使用kubectl将其从集群中删除。可以通过ignore-not-found=true忽略资源未找到的错误
从集群卸载CRD:
查看makefile定义:
1
2
3
.PHONY: uninstall uninstall: manifests kustomize ## Uninstall CRDs from the K8s cluster specified in ~/.kube/config. Call with ignore-not-found=true to ignore resource not found errors during deletion. $(KUSTOMIZE) build config/crd | $(KUBECTL) delete --ignore-not-found=$(ignore-not-found) -f -
先运行manifests和kustomize目标
使用kustomize 构建config/crd目录中的资源,并使用kubectl将其从集群中删除,可以通过ignore-not-found=true忽略资源未找到的错误
6 其他 这是在我们本地运行的controller,我在最初一直想不通是怎么连接的集群的,知道想起了最初的client-go的使用。
在看本文的同学,肯定是听说过,甚至使用过client-go的,我们可以使用client-go去实现一些小工具,比如说某个namespace下pod的查询,甚至可以获取node的列表,pod的全部信息等等,只要是kubectl可以做的,都可以通过client-go来实现,并且可以做更复杂的场景。
我们是可以在工具里指定kubeconfig的路径的,让client-go去读取,并渲染对应的client,然后和对应集群的apiserver做交互。
知道了这点,那么问题来了,operator是怎么做的呢,operator其实是使用的controller-runtime库,他和client-go有什么区别呢,他是client-go以及其他库的更上一层封装。
所以虽然没具体看,但是controller-runtime肯定是默认读取的$HOME/.kube/config文件的kubeconfig,至于可不可以指定其他的kubeconfig,理论上是可以的,因为就是指定下kubeconfig的路径,然后去读取渲染client,这里和自己直接使用client-go去实现是一样的逻辑。
但是,controller-runtime究竟支不支持,还需要自己去找一下源码或者资料,因为本地运行controller这本身肯定是不建议的,所以不支持也是说得过去的。